
Background
There are a number of configuration settings that should be enabled in order to "harden" the Triofox Cluster. For example, in order for the system to pass a penetration test, these settings will most likely be required. WARNING: Review Triofox Support for TLS 1.1 and TLS 1.2 before performing the steps in this article.
Checklist
- There must be a valid server certificate bound to TCP 443 in IIS Manager.
- Verify that the system responds to the https://<fqdn> URL, where <fqdn> is the fully qualified domain name of the Triofox cluster.
- Verify that the server certificate reported by the browser is valid and there are no certificate errors.
- Navigate to Advanced Settings > Worker Nodes
- Click the pencil icon (Edit)
 . Set the External URL to be the fully qualified domain name of the Triofox cluster.
 - Click the gray gear icon (Advanced Settings)
 .
. - Enable Always force SSL on Login
- Always force SSL for Native Clients
- Click the pencil icon (Edit)
- Navigate to (12.7+) Advanced Settings > Settings > Cluster Settings
- Enable: Hide login failure message details
- Enable: Hide build number from login page
- Click the disk icon in the lower right to save the settings
- Navigate to (12.7+) Advanced Settings -> Client Access Policy
- Create a new policy
- Select "Access from Internet"
- Select "Deny the following checked permission"
- Check "Web Management"
- Save the policy (Caution: This setting will automatically reject internet access once committed)
Update machine key
Triofox installation contains a default machine key. To enhance security, change the default machine key. Keep in mind new Triofox installation will update the machine key automatically.
- On Triofox server, go to the installation folder C:\Program Files (x86)\Triofox\root
- Make a backup of web.config
- open IIS Manager
- Select Sites, Default Web Site. In the middle ASP.NET section, double click Machine Key
- It shows the current machine key used. Click 'Generate Keys' on the right pane
- A new machine key is generated. Click Apply to save it to root\web.config
- If you have multiple worker nodes, all nodes need to use the same machine key. Follow the above procedure to generate a new machine key on one node. Copy the new machine key on root\web.config on the node.
- Go to all other nodes. Make a backup of root\web.config. Edit root\web.config to use the same machine key as the first node. Save the change.
- Restart IIS.
TLS Setup
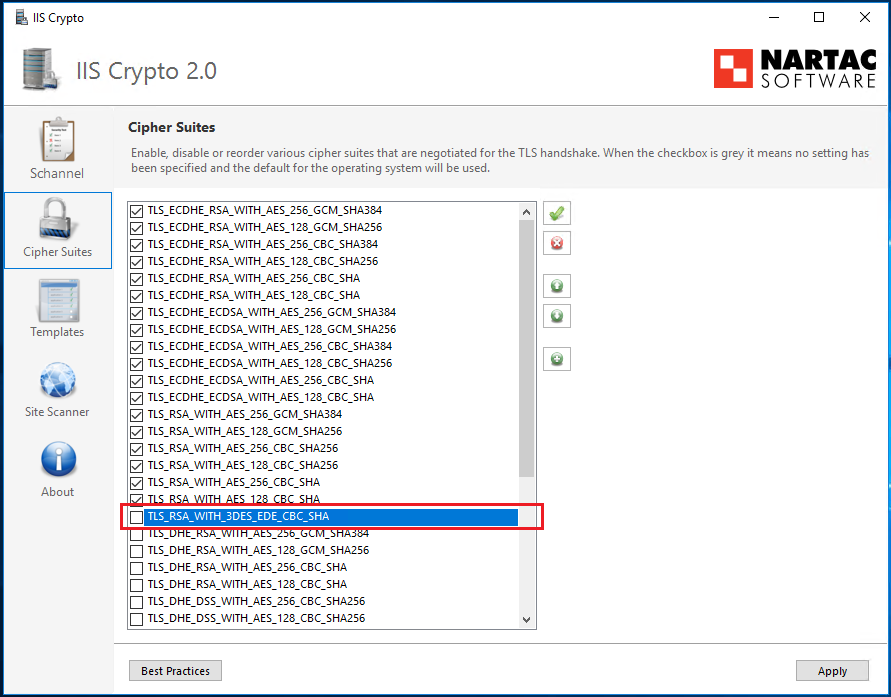
- Download IISCrypto and apply the PCI 3.1 template which disables all SCHANNEL protocols except TLS 1.1 and TLS 1.2.
- Additional in IISCrypto, disable TLS_RSA_WITH_3DES_EDE_CBC_SHA as it is considered a medium strength cipher:
Other Settings
Hide Server Info in Header
Some penetration tests will insist that the server response headers should not display version or platform information about the server. For example this curl command will display the response headers:
curl -I https://cspentest.hadroncloud.com/portal/loginpage.aspx
HTTP/1.1 200 OK
Cache-Control: private
Content-Length: 44437
Content-Type: text/html; charset=utf-8
Server: Microsoft-IIS/10.0
X-AspNet-Version: 4.0.30319
Set-Cookie: y-glad-lsid=; domain=cspentest.hadroncloud.com; path=/; secure
Set-Cookie: y-glad-state=; domain=cspentest.hadroncloud.com; path=/; secure
Set-Cookie: y-glad-token=; domain=cspentest.hadroncloud.com; path=/; secure
Set-Cookie: y-glad-sharetoken=; domain=cspentest.hadroncloud.com; path=/; secure
X-Powered-By: ASP.NET
Date: Mon, 27 Aug 2018 16:58:33 GMT
The theory is that the response fields, Server, X-AspNet-Version, and X-Powered-By contain information about the server that could be used to attack it.
- To disable the X-AspNet-Version:
-
Start PowerShell as Administrator (elevated) and execute this command:
Set-WebConfigurationProperty -filter /system.web/httpRuntime -name enableVersionHeader -value false -PSPath 'IIS:\Sites\Default Web Site'
-
-
Use this at your own risk. It hasn't been fully tested. To return empty strings for the Server and X-Powered-By response headers:
- Install the URLRewrite tool on the Triofox server: http://www.iis.net/downloads/microsoft/url-rewrite
- In IIS Manager click on the server name (this setting will be server-wide in scope)
- Open the URL Rewrite feature.
- In the Actions pane, click View Server Variables
- In the Actions pane, click Add...
- In the Add Server Variable dialog type: RESPONSE_SERVER
- Again in the Actions pane, click Add...
- In the Add Server Variable dialog type: RESPONSE_X-POWERED-BY
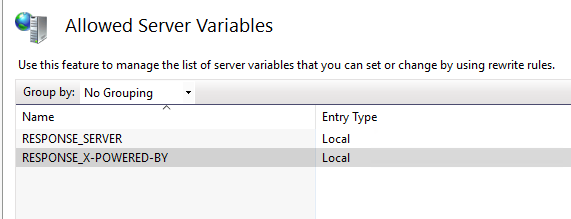
- The middle pane will look like this after both server variables are added:
- In the Actions pane, click Back to Rules
- In the Actions pane, click Add Rule(s)...
- In the Outbound rules section click Blank rule then click the OK button.
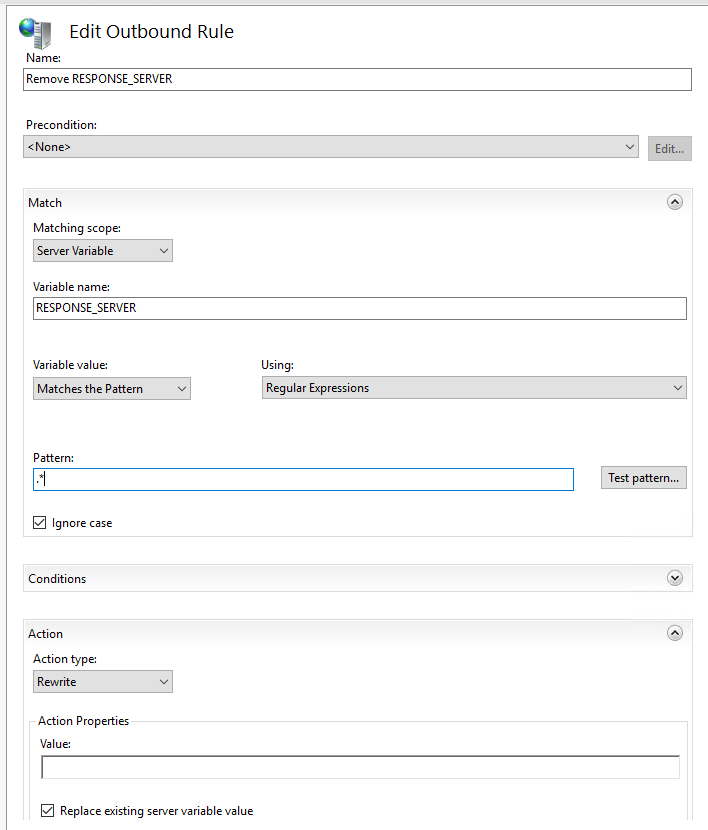
- For the first outbound rule match this screen:
- In the Actions pane, click Apply
- In the Actions pane, click Back to Rules
- In the Actions pane, click Add Rule(s)...
- In the Outbound rules section click Blank rule then click the OK button.
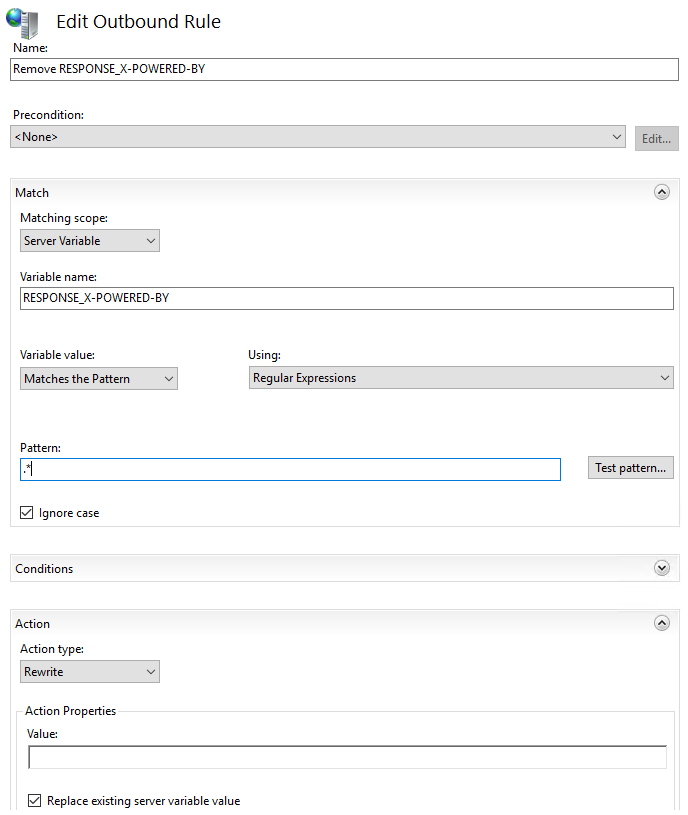
- For the second outbound rule match this screen:
- In the Actions pane, click Apply
- In the Actions pane, click Back to Rules
- The two rules will be displayed as:

-
Use curl or a similar tool to verify the response headers are empty:
curl -I https://cspentest.hadroncloud.com/portal/loginpage.aspx
HTTP/1.1 200 OK
Cache-Control: private
Content-Length: 44437
Content-Type: text/html; charset=utf-8
Server:
Set-Cookie: y-glad-lsid=; domain=cspentest.hadroncloud.com; path=/; secure
Set-Cookie: y-glad-state=; domain=cspentest.hadroncloud.com; path=/; secure
Set-Cookie: y-glad-token=; domain=cspentest.hadroncloud.com; path=/; secure
Set-Cookie: y-glad-sharetoken=; domain=cspentest.hadroncloud.com; path=/; secure
X-Powered-By:
Date: Mon, 27 Aug 2018 17:21:42 GMT
Enable HSTS
Use this at your own risk. It hasn't been fully tested. Some penetration tests will insist that "HTTP Strict Transport Security" (HSTS) be enabled on the website. For more information see: https://docs.microsoft.com/en-us/iis/get-started/whats-new-in-iis-10-version-1709/iis-10-version-1709-hsts.
Only follow the steps below if it is absolutely necessary.
To enable HSTS for the Triofox web server:
- Install the URLRewrite tool on the Triofox server: http://www.iis.net/downloads/microsoft/url-rewrite
- Start a text editor (such as Notepad) running as Administrator (i.e. "elevated") and open "C:\Program Files (x86)\Triofox\root\web.config".
- Near the end of the file, locate the line that reads: </system.webServer>
-
Insert the following text just prior to </system.webServer>:
<rewrite> <rules> <rule name="Redirect HTTP to HTTPS" stopProcessing="true"> <match url="(.*)" /> <conditions> <add input="{HTTPS}" pattern="off" /> <add input="{HTTP_HOST}" pattern="^localhost(:\d+)?$" negate="true" /> <add input="{HTTP_HOST}" pattern="^127\.0\.0\.1(:\d+)?$" negate="true" /> </conditions> <action type="Redirect" url="https://{HTTP_HOST}/{R:1}" redirectType="Permanent" /> </rule> </rules> <outboundRules> <rule name="Add the STS header in HTTPS responses"> <match serverVariable="RESPONSE_Strict_Transport_Security" pattern=".*" /> <conditions> <add input="{HTTPS}" pattern="on" /> </conditions> <action type="Rewrite" value="max-age=31536000" /> </rule> </outboundRules> </rewrite> - Save "C:\Program Files (x86)\Gladinet Cloud Enterprise\root\web.config"
Protect against clickjacking
To protect against clickjacking attacks add the X-Frame-Options header (or XFO header):
- In IIS Manager select the Default Web Site node in the tree pane.
- In the middle pane double-click HTTP Response Headers
- In the Action pane click Add...
- In the Add Custom HTTP Response Header dialog:
Name: X-Frame-Options
Value: SAMEORIGIN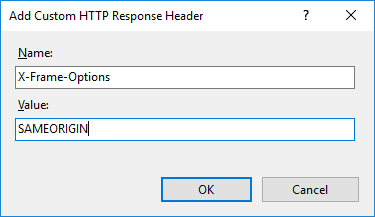
- Click the OK button
- Again, in the Action pane click Add...
- In the Add Custom HTTP Response Header dialog:
Name: Content-Security-Policy
Value: frame-ancestors 'self'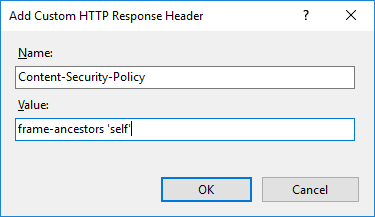
- Click the OK button
- Again, in the Action pane click Add...
-
In the Add Custom HTTP Response Header dialog:
Name: X-Content-Type-Options
Value: nosniff - Click the OK button
Hide private IP
Use this at your own risk. It hasn't been fully tested. The server may return it's private IP address if a response header is submitted to the server. To reject empty response headers:
- Install the URLRewrite tool on the Triofox server: http://www.iis.net/downloads/microsoft/url-rewrite
- In IIS Manager click on the Default Web Site
- Open the URL Rewrite feature.
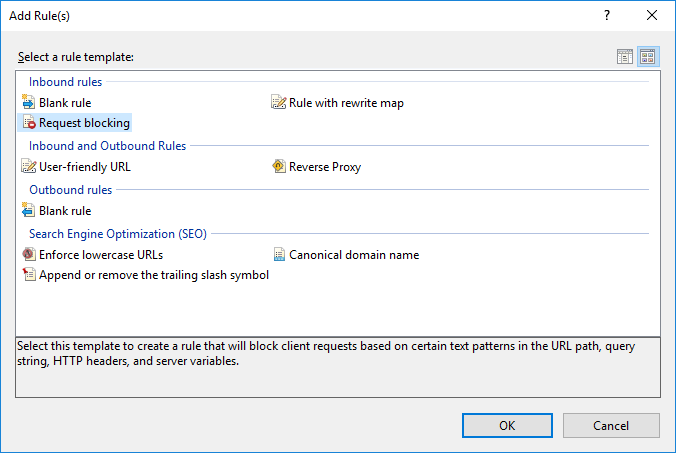
- In the Actions pane click Add Rule(s)...
- In the Add Rule(s) dialog select Request blocking then click the OK button:
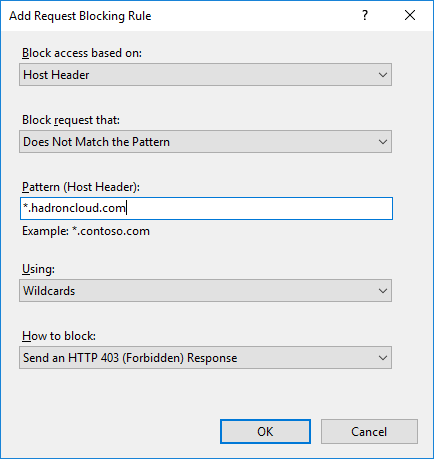
- In the Add Request Blocking Rule:
- Block access based on: Host Header
- Block request that: Does Not Match the Pattern
- Pattern (Host Header): *.<yourdomainname>
- Using: Wildcards
- How to block: Send an HTTP 403 (Forbidden) Response
Comments
0 comments
Please sign in to leave a comment.